
Dental Operating Microscope
![]() Dentaltown Magazine
Dentaltown Magazine
by Donato Napoletano, D.M.D,
November 2014
The dental operating microscope (DOM) is perhaps one of the most valuable technologies available in dentistry today. In addition to having multiple levels of magnification available at a turn of a dial and superb, shadow-free illumination resulting in increased visualization, increased diagnostic capability, and an increased level of precision when executing various dental procedures, the DOM can also be an invaluable tool when it comes to patient education through its digital documentation capabilities. (Figs. 1-4)
 Perhaps most importantly, the DOM allows the clinician to operate in a comfortable, ergonomically-friendly upright postural position, which reduces strain and fatigue to the eyes and musculoskeletal system. Having conducted hands-on, live patient-training sessions both privately and at Tufts University’s GPR program (possibly the first GPR program in the U .S. providing a DOM for every resident rotating through the dental clinic), I thought this would be a great opportunity to share some practical and hopefully useful information I have learned through training other dentists on how to integrate dental microscopy into a practice.
While the learning curve in operating a DOM can seem challenging and somewhat frustrating at times, formal training can significantly reduce the time needed in successfully integrating them. But for those who desire to start out on their own, following and practicing a few basic guidelines will be helpful in the initial phases of the integration process.
While the integration time varies, once the DOM is fully integrated, the operator will likely wonder how they ever worked without one. The ability to diagnose problems will dramatically improve. Areas of the mouth or a specific tooth that were previously difficult to visualize (even in patients with restricted access) will become very easy to see and operate in. A patient’s trust level and acceptance of treatment recommendations will likely skyrocket (especially if the DOM is equipped with digital documentation capabilities).
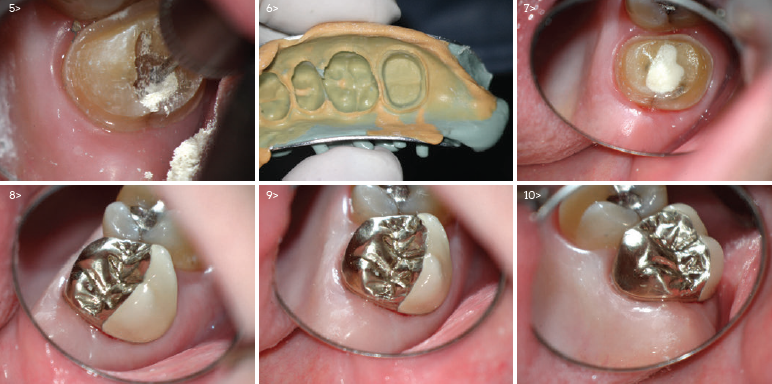
And finally, the clinician will be operating in a very comfortable upright postural position while executing procedures at a level of precision one never imagined possible. (Figs. 5-10)
Just realize that this does not happen overnight, and that the essential ingredients to integrating any new procedure or technology are patience, practice and persistence.
DOM integration basics
Location
If the DOM is not positioned or mounted in a location of the operatory that does not allow for easy access, it will simply not be used. It is therefore critical that the DOM is located in an area of the operatory that will allow for easy access so that it may be easily maneuvered into the operating position. DOMs can either be mounted on a movable floor stand or permanently mounted to the floor, wall or ceiling. F or right-handed operators, it is best
to mount the DO M on the ceiling, located to the left side of the dental chair if possible.
Par-focaling
Par-focaling a DOM simply means, tuning the DOM to the individual user’s eyesight. It is a simple procedure that is covered in the owner manual that only takes a few minutes to do and should be done periodically. The importance of par-focaling the DOM is basically two-fold. It helps to ensure that the microscope stays in relative focus when changing levels of magnification without having to move the DOM up or down to bring the operating field back into focus. And it helps to ensure that photographs taken with an integrated digital still camera are in focus. When a DOM is not par-focaled correctly to the operator’s eyes, an image that is in focus to the operator may be out of focus to the camera.
Position
Unfortunately, learning how to effectively position the DOM so that the operating field or target tooth can be visualized is something that cannot be effectively taught in a short span of time. Some will find formal training helpful, and some will learn it through trial and error.
When I teach beginners how to operate, there are a few basic (yet critical) aspects of the process that if the user is not aware of will make it very difficult to integrate a DOM successfully, no matter how much patience, practice and persistence are applied. The most important things to be mindful of when learning how to position the DOM is that in addition to the DOM itself, the position of the patient chair, patient’s head and mirror also need to be considered when trying to visualize the operating field or a target tooth.(Figs. 11-20)


Five helpful implementation tips
1. Keep the patient chair-height low.
Actually, in most cases, there is no need to raise it at all! When working with loupes or unassisted vision, most clinicians tend to recline the chair-back and also raise the chair height in order to bring the operating field closer to the operator. When working with a DOM, it is preferable to recline the chair-back and not raise the chair height much, if at all. The reason being that if the chair height is raised too high, the DOM will also need to be positioned higher in order to focus on the operating field. While most DOMs come equipped with inclinable binoculars, I have seen some operators raise the patient chair so high that they are not able to comfortably reach the eyepieces even when the binoculars are fully inclined to its most downward position.
2. Fully recline the patient chair and once reclined, have the patient scoot up on the chair.
When the chairback is first reclined, the patient’s body tends to slouch downward on the chair, positioning their head further away from the operator. So once the chair is reclined, the patient should always be asked to scoot their bodies up on the chair. This will bring the patient’s head closer to the operator, which in turn allows for the DOM to be positioned closer to the operator so that the operator does not need to tilt their head excessively forward to reach the oculars. Most DOM manufacturers have an optional attachment called an extender (which I highly recommend), that extends the eyepieces even closer to the operator, further reducing the amount of forward necktilt needed to reach the oculars.
3. Use the DOM on every patient.
With the exception of removable prothodontics, the DOM should be positioned in place and used on virtually every patient seen. During the initial integration, the most time-consuming aspect is just getting the DOM in the ready position efficiently. Practice significantly decreases the amount of time needed in getting the DOM in the operating position.
4. Move the patient’s head around often.
When I watch beginners trying to visualize a target tooth, many will tend to move, rotate or tilt the DOM around in positions that are not ergonomically friendly to the operator. Remember that in addition to the DOM, the patient’s head can move too! Effectively visualizing all areas of the mouth often requires a combination of tilting and rotating the DOM, the patient’s head and mirror. When trying to visualize maxillary posterior teeth for instance, having the patient tilt their heads back (chin-up) will help increase visibility.
A slight rotation of both the patient’s head and the DOM may also be required at times. For instance, when trying to visualize a posterior tooth in the left arch, a slight rotation of the DOM and patient’s head to the left will be helpful, assuming the operator is right-handed and working from an 11-12 o’clock position, which in my experience is the best position to work from when using a DOM.
Once the patient and DOM are positioned, use the DOM through as much of a procedure as possible. If difficulties arise intra-operatively and feelings of frustration arise, it is perfectly fine to push the DOM aside and continue with loupes if needed. Once a preparation is completed, take out the DOM again to inspect the preparation. Chances are the operator will notice areas of a preparation requiring some refinement — refinements that should be done with the microscope.
5.The boDOM line.
If the operator patiently and persistently practices getting the patient chair, DOM,
patient’s head and mirror properly positioned, then soon enough, the amount of time required in accomplishing this task will decrease and become second nature. If the operator makes an effort in starting every procedure with the DOM, in time, more procedures will be executed with the DOM, until the need of pushing it away no longer arises. Once the operator sees fi rst hand what they have been missing, namely, superb visualization of the operating field while working in a comfortable postural position, he or she will wish they had started using the microscope sooner. And don’t forget the ease of capturing and sharing images with the patient. Add up all the capabilities and possibilities in using it in your practice, and see how fast you reach a state of DOM nirvana.
Author’s Bio
Dr. Donato (Dino) Napoletano is a restorative dentist at Donato Dental in Middletown, New York, where he routinely utilizes technologies such as dental operating microscopes, CEREC, and multiple laser wavelengths in the diagnosis and treatment of caries and periodontal disease. He is also a technology integration consultant at Donato Dental Systems dedicated to helping dentists evaluate, select and integrate various technologies in a systematic and time-effi cient manner. Dr. Napoletano can be reached by email at donato@donatodental.com or by phone at 845-342-6444.